Aeonics Developer Guide
Introduction
This documentation is intended for developers, system administrators, devops, fullstack engineers or whomever has sufficient background knowledge to understand it. It exposes various details about the Aeonics system, the overall principles as well as the motivation behind some architectural software choices.
The content of this guide is protected by intellectual property rights and is subject to the Aeonics Commercial License Agreement. The information contained in this documentation is provided as-is without any guarantee of correctness nor any other sort, it is provided in good faith and is regularly checked and updated. If some content is not clear, outdated or misleading, please let us know and we will try to fix it. Some fine internal details are voluntarily omitted from this guide, if you need more information about a specific aspect, please contact us.
The form and language used in this guide is non-formal and intended for trained professionals, therefore some technical details may be omitted and/or the examples provided may not work or compile as-is. This guide is thought to be used along the official javadoc that include the specifics of every class and method of the Aeonics SDK. If you see ways to improve this guide or if you believe some notions would benefit from more details, please let us know.
The sections used in this guide are organized based on logical order, it is important to understand the key concepts before diving into the fine details because the approach and methodology promoted in this guide may seem unconventional. Aeonics focuses on efficiency which is defined as the ability to accomplish sufficient result with the least amount of effort, time or resources. Throughout this guide, we encourage you to focus on the most relevant functionalities first and keep your technical debt with those time-consuming details for later, if those ever occur.
Conventions
In this document, you will encounter different notations. Words highlighted in blue or orange are special keywords
that are important. Other words with a grey background means that it references a technical term or a code-specific keyword.
There are also some code samples or configuration bits that are displayed in separate blocks. The color and header of the block provides some context on how to read the content.
This block type contains JSON information
This block type contains command lines to run in a shell or prompt window
This block type contains Java code
This block type contains the configuration information about a specific item type
This block type contains other unspecified information
This documentation is constantly evolving, so sections or paragraphs highlighted in yellow means that some additional content should be delivered soon...
Next steps
This guide contains explanation about the context and the global system principles. Additional documentation and next steps are :
- Github: Some code samples and other material are publicly published on Github.
- Javadoc: The official Aeonics SDK javadoc.
- Technological Overview: The overview of core principles and terminology.
- Tutorials: Some tutorials and code samples to get started quickly.
- Modules: Aeonics is a modular system and each module provides its own functionalities. This documentation lists the specific configuration parameters and detailed behavior of all officially supported module.
- Aeonics Frontend Framework (AFF): Aeonics uses its own lightweight frontend single page application framework. You can reuse this framework to build your own applications.
Initial setup
Requirements
Aeonics is a standalone application that runs on top of the JVM. Therefore, it can be deployed on any operating system and any virtualization technology that is supported by the JVM.
The base requirements are:
- Runtime: Java 11
- Disk space: minimum 10MB
- Memory: minimum 128MB RAM available for the JVM to start, minimum 16MB heap space for Aeonics to run
- Network: port 80 should be open to use the web interface
- Privileges: Aeonics should be run using an elevated account able to start the web server on port 80 and should have full privileges on its own disk location to manage files internally. However, it is possible to use another port number or run as a regular account if necessary.
There are no further requirements in terms of processing power, Aeonics will use the available resources from the system. The performance of the system will depend on the number of available (v)CPU and their clock frequency. The recommended processing power for a baseline system is 2 (v)CPU @2GHz.
Additional storage, databases or network connectivity may be necessary depending on your business logic, those are not part of the base requirements.
Installation
Aeonics can be run from any location and does not require any installation per-se. The system is distributed as an archive file (usually a compressed tar file). In order to run, you must obtain a valid license file which is password protected and place it in the same folder as the rest of the Aeonics files.
Deployment procedure on Red Hat, Debian, Ubuntu, Linux, Mac OS and other Unix-based systems:
- Uncompress the Aeonics archive to a location accessible to your operating system.
$ mkdir /opt/aeonics
$ tar -xzf aeonics.tgz -C /opt/aeonics
- Copy the Aeonics license file to the same location.
$ cp aeonics.license /opt/aeonics
- Start Aeonics using the standard Java command and specify the license file password.
$ cd /opt/aeonics
$ export AEONICS_LICENSE_STORE_PASS=secret
$ java -jar aeonics.jar
Deployment procedure on Windows:
- Uncompress the Aeonics archive to a location accessible to your operating system.
> mkdir D:\aeonics
> tar -xzf aeonics.tgz -C D:\aeonics
For older Windows version, decompress the archive manually. - Copy the Aeonics license file to the same location.
> copy aeonics.license D:\aeonics
- Start Aeonics using the standard Java command and specify the license file password.
> cd D:\aeonics
> set AEONICS_LICENSE_STORE_PASS=secret
> java -jar aeonics.jar
File structure
The Aeonics deployment directory contains a set of files and folders by default. Those can be modified at runtime using environment parameters defined at startup.
- aeonics.jar : this is the boot loader of the Aeonics system
- aeonics.license : this is the license file required to start the system
- modules : this folder contains all the plugin modules
- snapshots : this folder contains all the snapshots of the system
- www : this folder contains all the static web applications and assets
Some additional modules may use other folders or files. Custom storage locations or custom behavior may also use other files from the filesystem.
Environment parameters
The Aeonics system will automatically look for some parameters at boot time.
- The system will first check the Java properties passed with the
-Dkey=valuecommand line parameters - If a value is not present, the system will check the local environment parameters
- Finally, if a value is still not present, a default value is set
The list of startup parameters is the following:
- AEONICS_LICENSE_STORE_PASS : the license file password. There is no default value, this parameter is mandatory
- AEONICS_LICENSE_STORE_PATH : the path to the Aeonics license file. The default value is
aeonics.license - AEONICS_LOG_LEVEL : the default log level before loading the custom config. The default value is
700 - AEONICS_MODULE_PATH : the path to the modules directory. The default value is
modules - AEONICS_SNAPSHOT_STORAGE : the path to the snapshots directory. The default value is
snapshots
Any other configuration parameter from the system can be initialized using the same technique and will be available
during the lifecycle LOAD phase.
The startup parameters are normalized when injected in the global system config: the leading AEONICS_ is removed,
all the _ are transformed to . and all lower case.
AEONICS_CUSTOM_PARAMETER -> custom.parameter
This means that in order to access the startup parameters from your code, you should use:
String value = Singleton.get(Config.class).get("custom.parameter");
First login
The system is ready once the lifecycle RUN phase has completed.
If an error happens during the startup, it will be displayed according to the default log level.
{"date": 1665089919589, "level": 700, "type": "aeonics.event.Lifecycle", "message": "Lifecycle RUN phase completed in 13ms"}
You can then use your browser and navigate to the address http://127.0.0.1/admin to access the Aeonics admin interface.
The initial username is admin and the password is admin.
Concepts
The Aeonics system and approach are based on a few important concepts and processes. It is important to understand those elements because they collectively form the backbone of the system.
Many of the technical choices and recommendations throughout this documentation are motivated by some key principles as exposed below:
- Stateless: the backend system should be independent of the frontend and thus make no assumptions about the way microservices will be used and how those will be orchestrated. Each function should perform its task without knowledge of past or future actions and only rely on input data to perform repeatable actions.
- Loose coupling: components in the system should be weakly referenced with each other, i.e. based on their name or unique ID such that changes in one does not affect the other. Referenced items may not exist yet or may be interchanged at runtime transparently. This construct allows to focus on behavior regardless of the user configuration that may only occur at a later point in time.
- Fail fast: resources should be used for meaningful tasks. Therefore, the system should be used in a compliant manner otherwise it should reject the request as early as possible using cheap fast checks. It is not worth putting effort in managing unexpected input or generating meaningful error messages for client applications that do not follow the guidelines or would not be able to handle the error anyway.
- Push ahead: every function should perform a small unit of work and delegate further processing to another function. This is the base bahavior for proper separation of concerns. Segmentation of the business logic in reasonably sized actions allow to reuse components in areas where it would not have been anticipated, and to better orchestrate the processing across the system.
- WYWIWYR: What You Write Is What You Run. Systems are sufficiently complex and hard to troubleshoot, therefore, the code that is written by the developer is the one that actually runs. There should not be any automatic code generation, transcription or reflective access that would make it harder to identify sources of errors and would decrease maintainability over time. For your code to remain concise, intuitive and efficient, it is our responsibility to provide the necessary APIs.
Architecture
The Aeonics system runs as a single process, it is therefore very easy to deploy, run and monitor. Internally, the system makes heavy use of multi-threading to be able to operate intelligently the entire processing power of the machine.
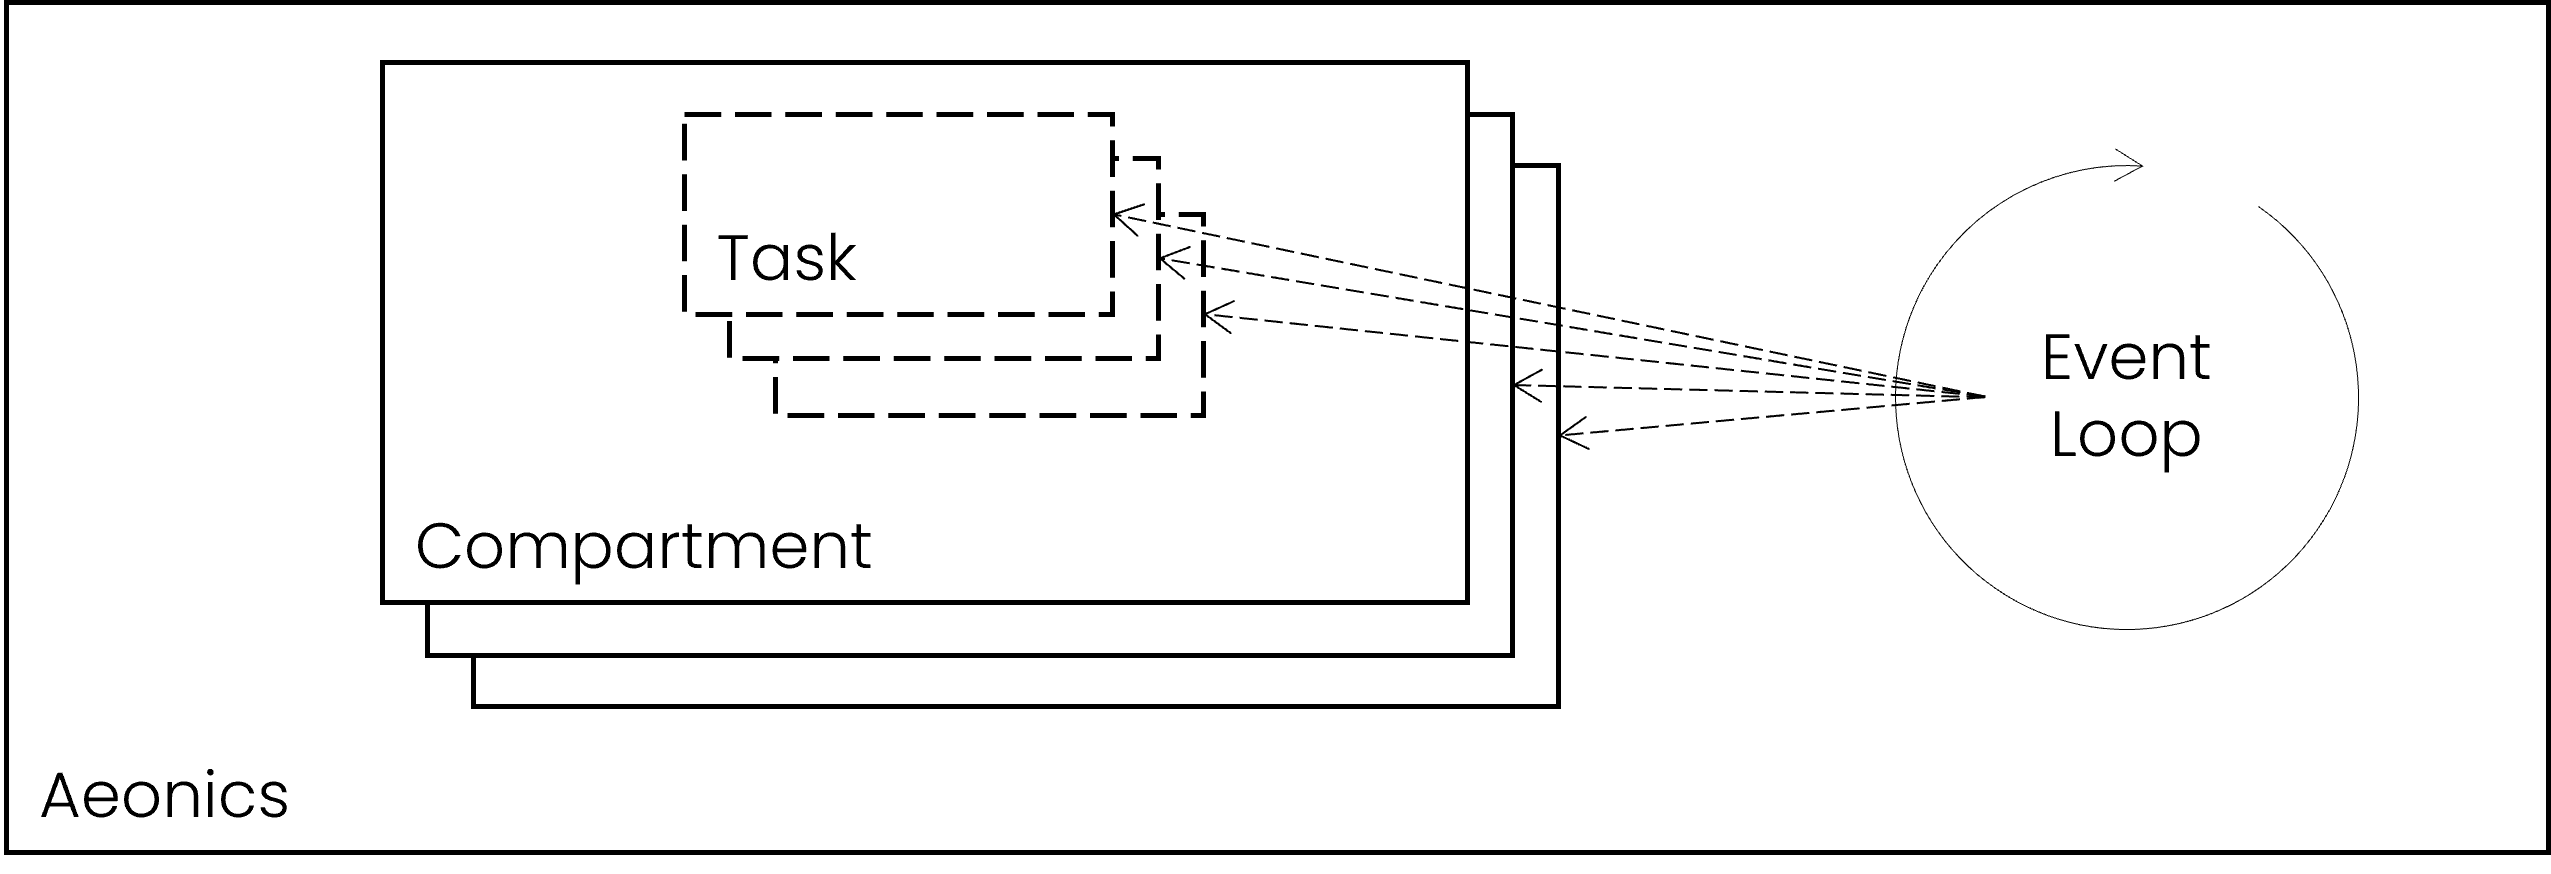
Compartments
All tasks are executed within a compartment, those define the rules for maximum number of tasks that can be executed simulteaneously and the maximum duration of each task. Each compartment handle a common type of tasks, i.e. all network-related operations are executed in the same compartment while application events are managed in a separate compartment. Furthermore, long-lasting background tasks are also executed in a dedicated compartment.
Compartment.submit("compartment name", () -> { });
Within a compartment, all tasks are executed asynchronously in a worker thread. Depending on the configuration, some compartments may execute a given number of tasks at the same time or will enqueue the exceeding tasks that cannot be executed immediately. The preferred way to submit asynchronous tasks is by using the Async class.
Compartment.createOrResize("compartment name", max_in_parallel);
All tasks are considered as events to be handled by the system. Each compartment is responsible for assigning tasks to an executing thread. Application events are tasks that carry additional data, they are handled by an event-loop which itself is a background task.
item.on("event name", (event) -> { });
item.trigger("event name");
Execution model
Aeonics is built as a specialized form of staged event-driven architecture (SEDA). Technically speaking, some stages are regrouped to reduce the latency of the system and to minimize the overhead of the queuing dynamics. However, by design, the different processing steps are clearly identified to promote the push-ahead principle.
Once the application lifecycle enters the RUN phase, the system fires application
events (i.e. PUBLISH) containing data collected at the INGRESS step. In turn, those events trigger the processing chain of operations as
configured in the central registry.
Concurrency
The Aeonics software architecture is designed to perform under potentially high concurrency in order to match available resources. The fact that all tasks are executed under a single process allows to use direct inter-task communication channels and share memory segments with nanosecond latency.
The Aeonics SDK pushes toward satelessness development in order to eliminate the need for thread synchronization mechanisms, and access to shared resources is simplified to avoid common pitfalls related to concurrency. Meanwhile, operations which by nature require specific synchronization will need to maintain those mechanisms.
Memory management
Aeonics is based on a pub/sub mechanism that is primarily memory-based as opposition to file-based. This decision is motivated by the reduced latency
and higher bandwidth of memory compared to a drive. Moreover, the energy required to operate data in memory is much lower than on a drive.
However, this implies that every Message flowing through the system must be entirely loaded in memory in order to be processed,
and thus, the system will be unable to process large data chunks that do not fit in the available memory of the system.
Potential data loss is discussed in the Data loss section.
Aeonics is therefore not suited (by default) to handle large (GB) file uploads or downloads, or processing large quantities of storage or database records at once. On the other hand, Aeonics is extremely efficient at handling large amounts of little (KB, MB) data chunks and reasonable-size transactions.
The system tries to avoid memory allocations and operates via low-copy using the MemoryView class which will
load data in memory once and work directly with bytes in-place. This approach reduces the need to duplicate (even temporarily) memory
blocks until it is absolutely required. By optimizing memory management, the system operates faster and uses less power to process data.
As much as possible, developers are encouraged to use the aeonics.memory.MemoryView class and to avoid using intermediate
temporary variables that will duplicate bytes in memory.
Lifecycle
The application goes through different phases when it starts, runs and shuts down. Those phases are dispatched in the form of events on the
aeonics.event.Lifecycle object.

- BOOT: When the system starts, it dynamically loads all modules according to their dependencies.
The
register()function is called for every module so that they may watch the other phases. It is the time for modules to register an event listener on the lifecycle object. - LOAD: Once all modules are loaded, the
LOADevent is triggered. It is the time to register the Factory items and perform basic initialization. In this phase, other factory items, registry items and even the configuration itself may not be available as they are set in later stages.
This event happens exactly once in the application lifetime. - CONFIG: After the load phase, the system loads the latest Snapshot and initializes the
Config object. Then, the
CONFIGevent is triggered. It is the time to register specific items in the Registry and setup config listeners. The system is not operational yet.
This event happens exactly once in the application lifetime. - RUN: After the config stage completes, the
RUNevent is triggered, the Logger is initialized during this stage and all background tasks are started. The system is considered fully operational when this stage completes.
This event happens exactly once in the application lifetime. - SNAPSHOT: When in the
RUNstage and a new Snapshot of the system is requested, theSNAPSHOTevent is triggered. It is the moment for modules to persist their state in the snapshot if necessary. The config and the registry are automatically included in the snapshot.
This event may happen multiple times (or never) in the application lifetime. - RESTORE: When in the
RUNstage and a snapshot restore is requested, theRESTOREevent is triggered. The system is paused during the restore process. The registry is cleared and reloaded from the snapshot, and other settings are restored. Finally, the system processing is resumed. It is the time for modules to clean the current state and reload a previous state from the snapshot.
This event may happen multiple times (or never) in the application lifetime. - SHUTDOWN: When the system initiates its shutdown sequence, the
SHUTDOWNevent is triggered. It is the time to properly cleanup resources and terminate ongoing operations.
This event happens exactly once in the application lifetime.
To be notified of lifecycle events, you can register an event listener as follows:
Singleton.get(Lifecycle.class).once(Lifecycle.LOAD, (e) -> {
	// this listener has been registered with 'once'
	// because it happens only once.

	// do something in the LOAD phase
});

Singleton.get(Lifecycle.class).on(Lifecycle.SNAPSHOT, (e) -> {
	// this listener has been registered with 'on'
	// because it can happen multiple times.

	// do something in the SNAPSHOT phase
});
Processing steps
The Aeonics system treats all data equally, the data journey is composed of different key steps from when it enters the system until it is conveyed to its final destination. When designing custom data flows, it is important to understand the concepts of the different steps to build flexible business logic.
Terminology
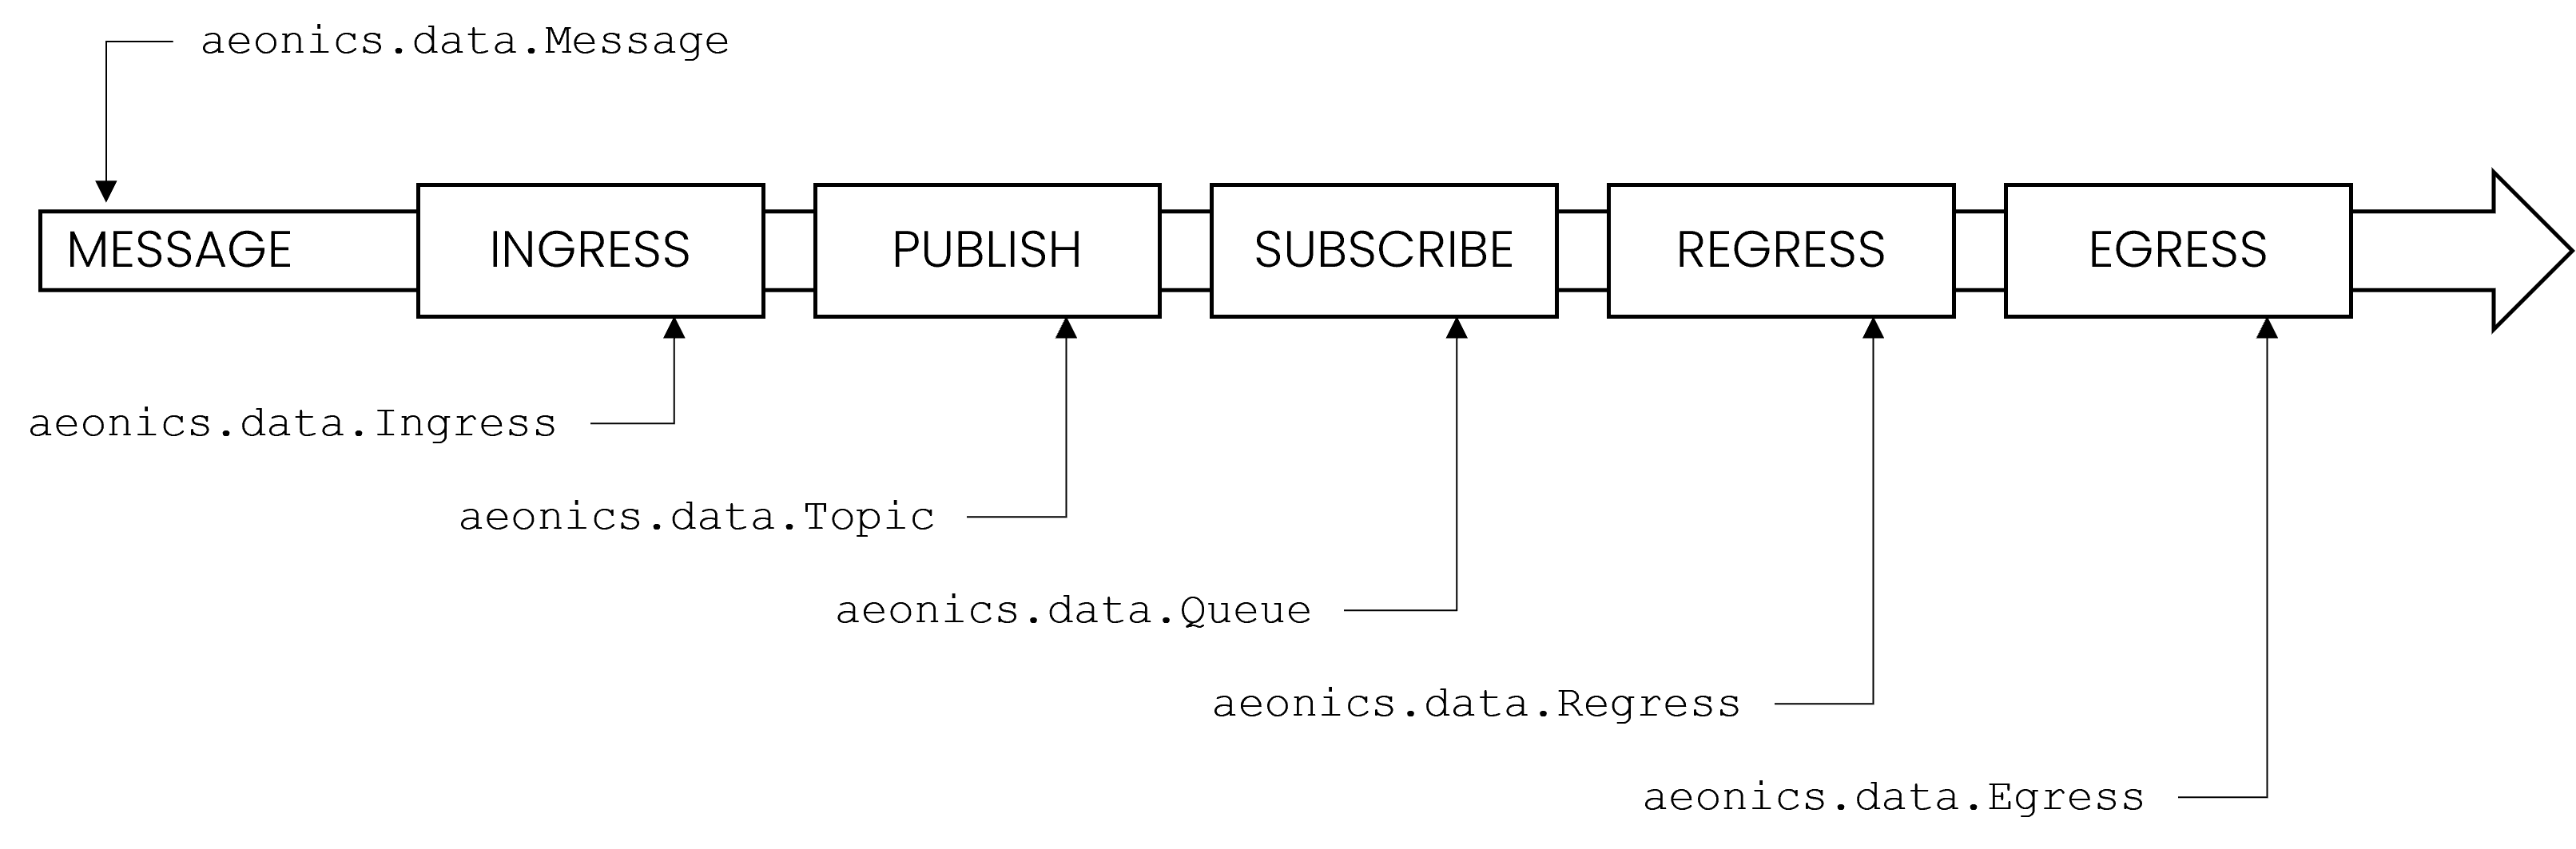
- INGRESS: the ingress step is about data acquisition, make data enter the system. An
aeonics.data.Ingressitem is a function that can listen on the network for incoming data, or fetch external sources at regular interval, or even run in the background with custom logic. The ingress step is responsible for retrieving raw bytes from the protocol encapsulation and transforming it into aaeonics.data.Messageitem.
It is not needed to actually decode or interpret the data yet because from the point of view of the ingress function, you have no information about what needs to be done with it, and you do not know where and when the data is going to be used. So, using the asynchronous event model, once a message is available, you should justpublish(message)it. - PUBLISH: messages are dispatched as an event in the internal pub/sub system. The security layer is activated to
allow or prevent the message from being published. If allowed, messages are pushed on a specific topic (a simple name)
which allows to easily segment the information. Every message contains a
path()indication which can further discriminate data.
When publishing a message, you do not know if there is actually a matching subscription. You make data available, what comes next depends on the user configuration. - SUBSCRIBE: an
aeonics.data.Queuecan subscribe to topics using Pattern matching against the message path. The elected messages are enqueued to allow further processing. If multiple queues capture the same message, the message is duplicated such that modifications to one does not affect the other. Each queue controls the following steps and may process multiple messages at the same time depending on the user configuration and available processing power. - REGRESS: the regress step is about data transformation, messages proceed through multiple sequential stages of transformation
in order to normalize, decode, or perform any custom logic on the enclosed data. A
aeonics.data.Regressitem is a function that recieves a message and has the opportunity to alter it in-place.
Each regress item perform a specific task and delegates further processing to the next regress function. From the regress point of view, you do not know where the data came from and where it goes afterwards. - EGRESS: the egress step is the final destination of the message. An
aeonics.data.Egressfunction accepts messages and persists the data to a database, a file, on the network or whichever custom logic. A single message may be forwarded to multiple destinations using different egress functions.
Every egress performs its own logic regardless of the data provevance and clueless about other potential destinations setup by the user.
Sequencing
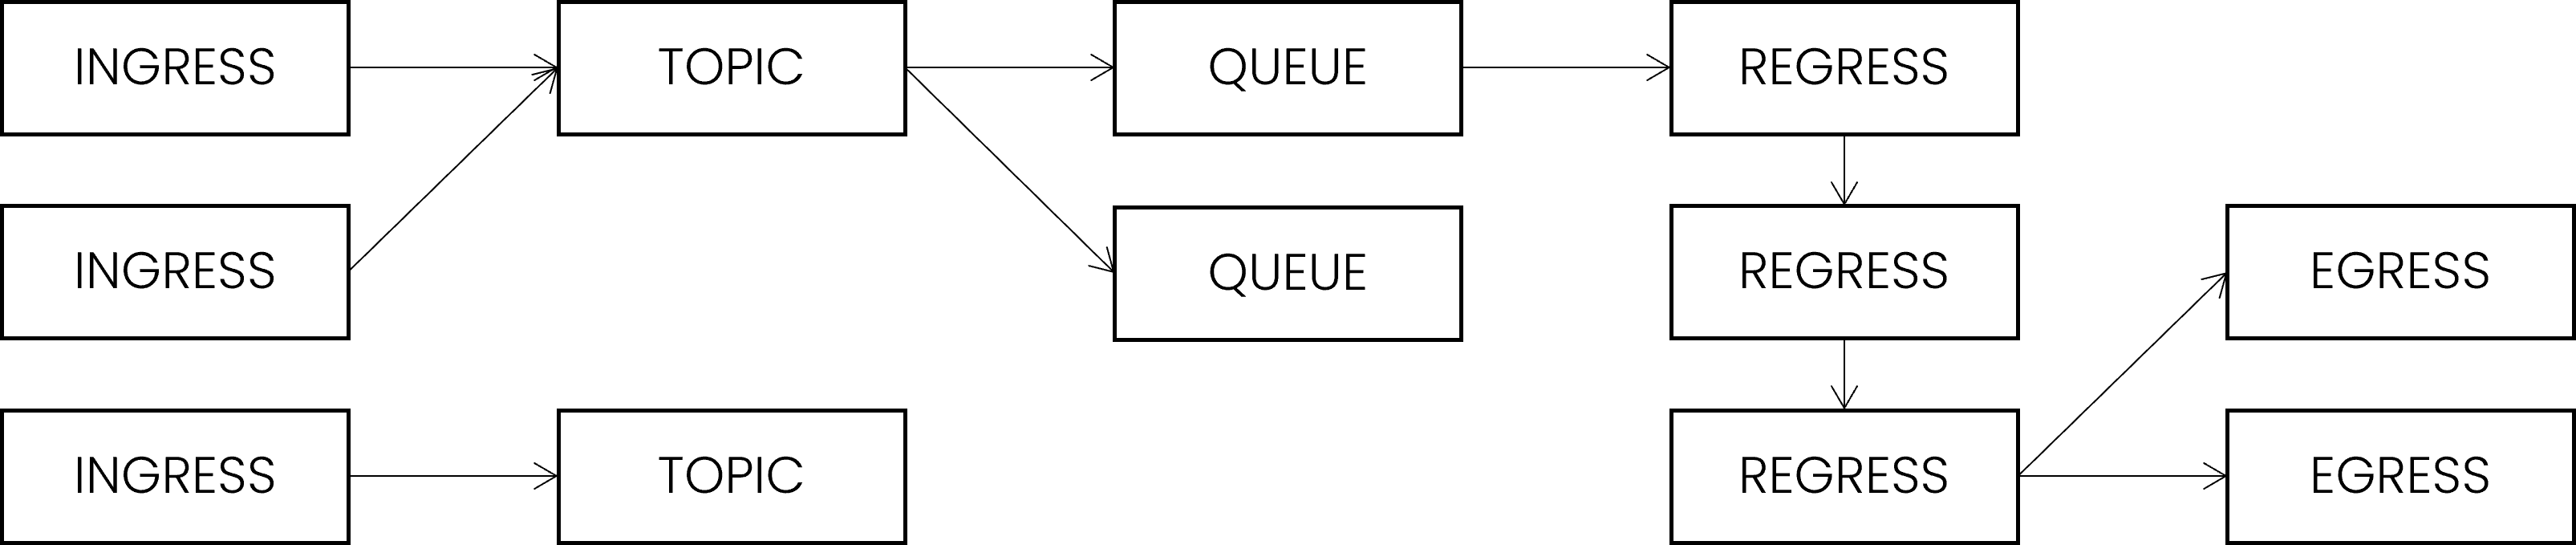
The relationship between the elements is defined at runtime by the user (or predefined for him). A data flow is the complete chain of operations that messages are meant to go through. The key principle are separation of concern and loose coupling.
- Usually, an ingress item publishes data to only one topic. Though, multiple ingress may publish messages in the same topic. Therefore, it does not matter where the data comes from as long as it enters the proper topic.
- Usually, a queue will subscribe to one topic. Though, multiple queues may subscribe to the same topic to provide a parallel processing workflow. Nothing prevents a queue from subscribing to multiple topics to collect messages from different sources. When a message enters a queue, it cannot tell which ingress it came from because, fundamentally, it should not matter.
- The queue rules and manages the sequential execution of all registered regress items, then forwards the message to all registered egress items.
- The queue is also responsible for retrying or discarding messages if a failure happens. Depending on the queue policy, there might be multiple processing in parallel and quotas about the number of pending messages.
Data & Items
The entire system is built around two basic object types:
- Data contains information that we work on and pass along
- Items are behaviors that will manipulate data
The Java programming language is a strongly typed language in which a String is not an Integer.
This distinction is made to model real world metrics into an internal representation of bytes. In the Aeonics ecosystem, we
try to abstract the technicality of the byte representation in order to focus on the meaning of the value it represents.
Therefore, the aeonics.data.Data class is used in a lot of places to hold information regardless of its actual type.
Aeonics makes heavy use of the JSON notation to represent human readable values because it is an efficient, readable and flexible way to
expose information. Some other data representation may offer better compression capabilities, or else but will undeniably complexify
the natural understanding that a human can process. In the same way, the Data object will accept scalar values, key-value pairs,
or a list of elements as closely as JSON can.
- PROs: you can store anything in a Data object and retrieve it with automatic conversions for most usual scalar values (String, Integer, Double,...). The Data class is very intuitive and easy to use, you no longer have to design a hardcoded class with member variable to hold information. The Data class is schema-less which means that the structure is flexible and can evolve over time, you can enrich an existing structure with additional information or return multiple values at once. The Data object is mutable which improves memory allocation and performance.
- CONs: you cannot enforce by contract what a Data object will contain. This may feel uncomfortable for traditional developers although fundamentally, you should know by-design what you need, what others need, and users should send a compliant value. This matches the fail-fast principle.
{
	"temperature": "42",
	"is_open": 0
}
Data data = Json.decode(json);
int temperature = data.asInt("temparature");
boolean isOpen = data.asBool("is_open");
An aeonics.util.Item on the other hand, is an instance of a class that model a specific behavior or functionality. More than just a class, items
can be (re)configured at runtime using a data object as configuration. This creates the opportunity to design pieces of reusable code that
will be assembled by the user according to his own business requirements. All items can also be encoded (serialized) as a data object
convertible to JSON. In other words, using plain JSON, it is possible to dynamically create instances of an Item in the system.
Items always inherit the following properties:
- id: a unique identifier that unambiguously targets a specific instance of a class. The ID is a
aeonics.system.Unique.IDwhich should be considered as an opaque string value. - created: the instance creation date.
- name: the instance user-given friendly name, because IDs are not so easy to remember. Beware that the name is not guaranteed to be unique.
- internal: whether or not this instance is considered an internally managed item (not serializable).
- __class: this is a virtual property that contains the fully qualified Java class name. This is requred to build new instance of the item from its JSON representation.
Items are described in this documentation using a simplified JSON notation. The basic properties above may be omitted because they are common to all items:
{
	id: the item unique identifier
	created: creation date in epoch ms
	name: friendly name
	internal: whether or not this item should be serialized
}
Each item is responsible for providing a documentation() data object to describe the expected parameters to create a new instance.
The documentation information is used in the frontend to generate the item creation form. Each item must have a public parameterless constructor
to allow dynamic instance creation.
The basic implementation aeonics.util.Item.Abstract makes it easier to design custom components:
public class Cat extends Item.Abstract
{
	public String shout() { return "meow"; }
}

Cat cat = new Cat();
// initialize using user-supplied data
cat.decode(Data.map().put("name", "Diego"));

System.out.println(cat.name() + ": " + cat.shout()); // Diego: meow
Messages
When data flows through the different processing steps, it is encapsulated in a aeonics.data.Message structure
that carries additional metadata. Messages are therefore composed of:
- content: the raw data. It may be a structured JSON structure, pure binary, or any other object type.
- metadata: a data object containing properties related to this message. You can also add your own metadata because this
is a regular data object like any other. The default metadata properties are:
- created: the message creation date expressed as a timestamp in milliseconds
- discarded: whether or not this message has been discarded
- client: the ID of the related
aeonics.network.Client(if any). This is useful when you need to send a response to the origin of the message - owner: the ID of the related
aeonics.security.User(if any). When using authenticated protocols, this is the ID of the authenticated user - path: the message binding key that is used for the
SUBSCRIBEstep using pattern matching - id: the unique ID of this message
- delay: an optional processing delay imposed for this message. Usually, a processing queue will block processing until the delay is passed even if there are other messages pending. This is to preserve the FIFO principle
- ttl: the time interval for which this message is considered valid. If greater than 0 and the time of processing is past due, the message is discarded
- expires: the absolute date as a timestamp in milliseconds at which this message expires and should be discarded
- retry: the internal number of failed processing attempts. If this number reaches the queue max-retry policy, the message is discarded
- topic: the latest topic this message was
PUBLISHto
For convenience, messages can be easily converted back and forth in JSON format. Thus, we use the JSON notation to describe messages as follows:
{
	"metadata": { ... },
	"content": { ... }
}
The role of ingress items is therefore to transform random input data to a compatible message structure such that it may be carried around and
interpreted seamlessly by other items in the system. The most important metadata property is the path which will be used by the
queue to filter and subscribe only to relevant messages.
byte[] binary = ...;
Message m = Factory.of(Message.class).produce(Message.class, Data.map()
	.put("metadata", Data.map()
		.put("path", "data/key/for/filtering"))
	.put("content", binary));
Topic.publish(m, "topic name");
Registry & Singleton
Throughout the system, items are made available to all components in a central aeonics.util.Registry. It is a way to maintain a set of elements
dynamically during the entire application lifecycle. Items are registered in different categories such that elements are grouped
in a logical manner and easily discoverable. You can only register items that are a subclass of the specified category:
class Animal extends Item.Abstract { }
class Cat extends Animal { }

Registry.of(Animal.class).register(new Cat());
You can retrieve items using their unique ID or their name (without guaranteed uniqueness) from any other component in the system. This allows to leverage loose coupling between items that are only referenced by a well-known name. The final implementation may be different or not exist at all, but this does not prevent to compile and run unitary functions.
Cat cat = Registry.of(Animal.class).get("6c034a3a-1529bdcb38100000");
Cat cat = Registry.of(Animal.class).get("Diego");
In some specific circumstances, you may want to get notified when an item is removed from the registry to cleanup resources or such.
You can register for the Registry.EVENT_DELETE event that is triggered for every item that is unregistered.
Registry.of(Animal.class).on(Registry.EVENT_DELETE, (e) ->
{
	Animal a = e.data.get();
	System.out.println("RIP " + a.name());
});
Finally, the registry is automatically saved and restored from the snapshot, so you do not need to handle persistence and system
recovery manually. Along with the central registry, the aeonics.system.Singleton object holds instances of
classes that should exist just once globally. The registry and singletons are totally independent and singletons are not snapshotted.
Config config = Singleton.of(Config.class);
Factory
Items that are publicly advertized can be created from anywhere in the system. Meanwhile, due to module isolation,
it may not be possible to create a new instance of a class directly. The final class may not even be available for your code to compile
at all. In order to simplify the item creation, items can be registered in the aeonics.util.Factory and constructed from
their data representation. This loosely coupled item creation mechanism provides more flexibility and the ability to control the
behavior of the system at runtime.
Factory.of(Animal.class).register(Cat.class);
// the Cat class is not available
Data data = Data.map().put("__class", "Cat");
// the factory creates it for us
Animal cat = Factory.of(Animal.class).produce(data);
The factory registration is typically performed in the during the lifecycle LOAD phase such that
other modules and components can create item instances in the following CONFIG phase when the registry is restored.
Config
All the configuration parameters and runtime variables are accessible from the aeonics.util.Config class. The Aeonics system does
not use traditional config files because those are static files that usually require an application restart to account for change. Instead,
all the parameters are stored in a data object that has the ability to trigger an event whenever a value is modified. This way,
components in the application can apply the newest settings at runtime without interruption of service.
The unique Config instance is available as from the lifecycle CONFIG phase and can be retrieved
from the Singleton holder.
Config config = Singleton.of(Config.class);
config.watch(
	"parameter name",
	(event) -> { System.out.println("new value: " + event.data); },
	"default value");
If an application requires some variable adjustments depending on i.e. the environment, the final customer, or else, you should declare those in the Config and set the final value at runtime or as environment parameters so that they are picked up from start.
// connect to a different ip address depending on the config
String ip_address = Singleton.of(Config.class).asString("remote.ip.address");
The configuration parameters are automatically saved and restored from the snapshot. Since the Registry and the Config are both loaded when the system starts, it may be difficult to decide whether a default initialization is required or if items have already been configured in a previous snapshot. Therefore, the Config is a convenient location to set a flag for default initialization.
if( !Singleton.of(Config.class).asBool("custom.flag") )
{
	// perform some default initialization
	// because this code has never been executed

	// then set the flag to remember it for next time
	Singleton.of(Config.class).put("custom.flag", true);
}
Storage & DataSource
Aeonics handles storage from a functional point of view to store, retrieve and list content regardless of the underlying implementation. This abstraction layer allows the developer to focus on the task itself and to delegate the final details further down the chain. Combined with the Registry principle, an item can be designed regardless of the technical details, and use resources in a completely transparent manner such that those may be changed or reconfigured at runtime.
Fetching a aeonics.storage.Storage object from the registry follows the loose coupling principle
because the storage may not exist yet at the time of writing or the final implementation may not yet be known.
// the final type of storage is unknown
Storage store = Registry.of(Storage.class).get("storage name");
Data is stored using an upsert paradigm, which means that missing data is created whilst existing data is overwritten with the new value.
You have the possibility to organize data as a file-structure using / as path separator. Listing data
can be done recursively with list() or just down one level using tree().
storage.put("path/to/file", "content");
storage.tree("path"); // -> path/to/
storage.list("path"); // -> path/to/file
There are several default storage types available in the system including an in-memory storage, direct disk storage or a datasource storage which sits on top of a database. In the last case, the tables in the database are seen as folders and every primary key is mapped as the object name.
Storing and retrieving data is a fundamental operation. Java offers a standardized java.sql api to work with typical SQL databases,
but it is very verbose and cumbersome to code with. With the emergence of new data storage technologies, providers tend to offer
custom libraries and tools to work with particular solutions. Although it may be convenient and easier at first, it prevents code
independence and forces a strong relationship with the chosen provider.
The Aeoncis aeonics.sql.DataSource class offers a smart and easy wrapper around standard jdbc providers. It handles
connection pooling, reconnections, timeouts, resources cleanup, and returns records in a generic Data object.
Once again, the underlying implementation is hidden and configurable at runtime.
The query() method will try to acquire a connection within allowed timeframe and perform the query. You can use it for
any request type SELECT, INSERT, UPDATE, DELETE or else and lets you provide additional parameters for parameterized queries.
// fetch the database no matter how it is configured
DataSource db = Registry.of(DataSource.class).get("database name");
// use a parameterized query to avoid SQL injections
Data rows = db.query("SELECT * FROM animals WHERE name = ? AND type = ?", "Diego", "Cat");
The datasource class allows multiple items to use of the same connection to the database at the same time to optimize resources.
This means that multiple queries may not exactly follow each other or might be executed using different connections.
Therefore, if multiple queries must be performed uninterruptibly using the same connection, then you should use
a try...with statement as follows:
try( Queryable q = db.next() )
{
	q.query("START TRANSACTION");
	q.query("DELETE FROM animals");
	q.query("COMMIT");
}
By default the queries are run synchronously because the task that performs the query is already most probably asynchronous. However, it is possible to run queries in the background and proceed when the query completes:
db.asyncQuery("SELECT * FROM animals").then(
	(result) -> { },
	(error) -> { });
By using the aeonics.sql.Jdbc class, it is possible to create a fully capable driver for any database type, including NoSQL.
Of course, the query performed on the database will contain specific statements or syntax depending on the actual implementation, but the
principle of querying for information remains unchanged.
Modules
The Aeonics system is build on modular bricks that are loaded dynamically at runtime. Every piece of code is encrypted to protect your intellectual property, and digitally signed to prevent execution of malicious code. Once loaded, modules can expose their functionalities to other components. There is no fancy custom compiler, no hidden metadata, no illegal reflection mechanism that will try to guess your intent: everything is explicit using the standard native java practices. Aeonics uses a direct approach based standard Java 9+ modules using the service implementation pattern:
module my.module.name
{
	requires aeonics.sdk;
	provides aeonics.system.Module with my.package.MyModule;
}
All of the components of the Aeonics system can be subclassed to provide custom behavior or embrace future technologies.
There are 2 exceptions to this rule: (1) the aeonics.security.Security cannot be altered although it is possible
to implement custom security providers, (2) the aeonics.event.Lifecycle that manages
the different phases of the application is also final.
This means that custom modules can enrich the system with new protocols, connectivity with third party systems, application
business logic, or any other behavior. The Aeonics core system itself is a module that is loaded and managed in the same way as any other module.
Class Sharing
A module can decide to share its classes with other modules in the system, or not. When a module shares its classes, then it means that any other module (including the core system which is also a module) can use those classes at runtime. On the other hand, if you prefer to keep your classes private, they will only be visible from your own module. By default, sharing is disabled.
public class MyModule extends Module
{
	// share classes in this module with the world
	public boolean shareClassLoader() { return true; }
}
Dependencies
Each module must specify the name of its dependencies. This defines the loading order before calling your register() function.
When relying on another Aeonics compliant module, just mention its name. When relying on third-party
components, then mention the full class name you require prefixed by an @.
By default, the core module is set as the module dependency.
public class MyModule extends Module
{
	// wait for other dependencies to be available
	// before calling the register() method on this module
	public List<String> dependency() { return Arrays.asList("http", "@third.party.Class"); }
}
The dependency management differs from the standard Java 9+ modules because Aeonics is using its own class loading mechanism.
Therefore, the module-info requires and exports directives are necessary to compile your code, but are ignored
at runtime.
Lifecycle
Modules are governed by the lifecycle of the application.
Therefore, it is important to obey the LOAD, CONFIG and RUN phases.
Loading of modules can be tricky because your module may be created (new) before your own dependencies are actually loaded,
and even before your own module classes. Therefore, your module class must not
reference any other class directly in its body because those may not be available yet. Instead, you should use an inner class
as follows:
public class MyModule extends Module
{
	public void register() { SafeInnerClass.register(); }

	private static SafeInnerClass
	{
		public static void register()
		{
			// it is safe to use other classes here
			third.party.Class x = null;
		}
	}
}
Then, it it safe to reference other classes from your own module and register to the aeonics.event.Lifecycle events.
Singleton.get(Lifecycle.class).once(Lifecycle.LOAD, (e) -> {
	// register Factory elements now
});

Singleton.get(Lifecycle.class).once(Lifecycle.CONFIG, (e) -> {
	// register Registry elements now
});

Singleton.get(Lifecycle.class).once(Lifecycle.RUN, (e) -> {
	// start custom behavior now
});
Compilation
In order to compile your own module, you need a reference to the aeonics.sdk.jar library. This is an empty placeholder
to allow compilation, it will be substituted at runtime. Compilation can be performed using standard Java commands:
$ javac -d ./bin -p . --module-source-path ./src --module my_module
$ jar -c --file=./my_module.jar -C ./bin/my_module .
Your standard Jar file needs to be transformed into a compilant module in order to be deployed on the system. Encrypt and digitally sign your jar file on the Aeonics portal manually via the web interface, or directly throught the REST API.
$ curl -X POST https://portal.aeonics.io/api/portal/generate/module \
	-u user:pass \
	-F "release=2022" \
	-F "jar=@/path/to/jar.jar" > /path/to/module.module
You can then deploy your module on your Aeonics instance manually via the web interface, or directly throught the REST API.
$ curl -X POST http://localhost/api/admin/module/upsert \
	-u user:pass \
	-F "archive=@/path/to/module.module"
Snapshots
Aeonics uses direct in-memory configuration and in-memory registry which
implies that those are not persisted across a system restart. In order to persist the configuration, the registry or other module-specific state,
the system may emit a SNAPSHOT lifecycle event.
The other way around, the system will reload automatically the last snapshot (using the alphabetical order) when the system starts, or may emit a RESTORE
lifecycle event to notify modules about an upcoming restoration of a previous state.
There is no automatic snapshot happening in the system when changes happen; changes are immediate in the live running system. This means that unsaved modifications are lost upon restart. Meanwhile, this also means that accidental mistakes can be recovered by restoring a previous snapshot, or by simply restarting the system which will reload the last known snapshot. You can see this principle as a failsafe.
Save
The core system will persist the configuration and all non-internal items in the registry automatically. Meanwhile, individual modules
may also perform some action when a snapshot is requested. The event data contains the snapshot name, and new files can be saved
in the snapshot storage using the aeonics.util.Snapshot class. The data is saved as a JSON file in the
storage.
Singleton.get(Lifecycle.class).on(Lifecycle.SNAPSHOT, (event) ->
{
	String snapshot_name = event.data.asString();
	Data data = Data.map().put("foo", "bar");

	Snapshot.save(snapshot_name, "file_name.json", data);
});
Restore
The core system will restore the configuration and all non-internal items in the registry automatically. Beware tht the registry is
cleared (except for internal items) before restoring items from the snapshot. Individual modules
may also perform some action when a snapshot is restored. The event data contains the snapshot name, and previously saved data
can be retrieved using the aeonics.util.Snapshot class.
Singleton.get(Lifecycle.class).on(Lifecycle.RESTORE, (event) ->
{
	String snapshot_name = event.data.asString();
	Data data = Snapshot.save(snapshot_name, "file_name.json");
});
Backups, Migrations, Releases and Horizontal Scaling
Snapshots are materialized by default as files saved in the system deployment directory. You may also download or upload snapshots in zip
format using the REST API. Therefore, it is very easy to pull a snapshot from one system and restore it on another system.
This applies fot backup strategies, migrations, releases across different environments, or for horizontal
scaling to spawn new instances of a clone system.
Using snapshots allows to fully automate the release cycle of your system and avoid human errors in the process.
Create a snapshot on the local system:
$ curl -X POST http://localhost/api/admin/snapshot/create \
	-u user:pass \
	-F "suffix=snapshot_name"
Download the latest snapshot from the local system:
$ curl -X POST http://localhost/api/admin/snapshot/download \
	-u user:pass > /path/to/snapshot.zip
Upload the snapshot on the remote system:
$ curl -X POST http://remote/api/admin/snapshot/upload \
	-u user:pass \
	-F "zip=@/path/to/snapshot.zip"
Restore the latest snapshot on the remote system:
$ curl -X POST http://remote/api/admin/snapshot/restore \
	-u user:pass
Although it is not strictly forbidden, restoring a snapshot on a system with different modules or different versions will most likely fail. Module and system alignment can also be automated using the REST API, or standard file management.
Not saved
Not everything is included in the snapshot by default. Only the config, the registry and the list of security providers are saved. This means that the following base components must be synchronized using other means:
- web apps: since web applications may reference files or directories located anywhere, the system does not know what to include or exclude. Simple web apps can be downloaded/uploaded using the REST API which is a way to backup and restore them.
- modules: the modules are not included because a different version may be deployed in another system, or its activation key may be different. Therefore, modules are not saved/restored automatically. Modules can be uploaded on a remote system using the REST API.
- licenses: the Aeonics license file that contains the certificates allowed to run modules on a system is not imported because it would violate the licensing agreement of Aeonics, and it forces a security review by importing third party certificates manually or using the REST API.
- other: any other resources that are not managed directly by the Aeonics core system are not included in the snapshots because Aeonics does not have knowledge of their existence.
Security
The Aeonics system handles security by-design and provides all necessary protection mechanisms to mitigate risks and ensure strong privacy. The security model is extensible to allow custom security providers to complement the built-in security implementation.
Algorithms
In this documentation, whenever the words 'encrypt', 'hash', 'token' and their variants are used, it is implied that the following underlying cryptographically-secure algorithms are used:
- Encryption: AES/GCM/NoPadding with an AES-256 key and a block size of 128bits
- Hashing: salted SHA-256 with variable asymetric recursion between 2e16 and 2e17
- Tokens: opaque value provided by a Security Provider. The default provider supports a meaningless salted random SHA-256 or an encrypted JSON structure
Custom modules or functionalities may use other security algorithms although it is recommended that any operation requiring cryptographically secure
operation use the verified methods exposed by the aeonics.security.Crypto class.
Components
The built-in security provider is using different components to model the secuirty rules. The meaning and behavior of those components is flexible in order to fit any similar or derived security model. Each component can be subclassed to provide custom behaviors in addition to the default functionality. It is also possible to use a custom security provider that does not use these elements.

User
The concept of user is to be able to unambiguously identify the person or entity involved in a security context.
It should be considered as technical object which sole purpose is to carry the identity of the authenticated party
and potentially ensure the link with its complete profile. Generally speaking, the user item should-not-but-may contain profile information.
Users are identified and referred to by their name, which is the login and not the real name of the person or entity.
The default aeonics.security.User item representation is:
{
	id: internal user id
	name: the user login
	created: user creation date

	active: true|false
	origin: the id of the security provider managing this user
	password: the password hash
	roles: the list of role id linked to this user
}
There are 2 special immutable users in the system:
- User.ANONYMOUS means that the user could not be identified because the user did not supply credentials or because the supplied credentials did not match any known user. Meanwhile, access may still be granted for public requests.
- User.SYSTEM means that it is an internal system call. Access is and should be always granted.
In the code, you can check for either with a strict equality check:
if( user == User.ANONYMOUS ) return false;
else if( user == User.SYSTEM ) return true;
Role
The role is just a name to target multiple users. The meaning of the name is unspecified which leaves the option to use it for organisational units,
functional role or any form of indicative tag.
The security policies are applied at the role level which applies to all users that are member of that role.
The default aeonics.security.Role item representation is:
{
	id: internal role id
	name: the role name
	created: internal creation date
}
Constraint
The constraint is an additional condition to check if a policy is applicable or not. It can target any security context parameter and
apply a pattern matching. Pattern matching is explained in section Pattern matching.
Multiple conditions can be combined by the policy to target and define fine-grained security rules.
Constraints are very powerful but add exponential complexity to the global human understanding. Combined double negations and inverted conditions are naturally hard to grasp for most people.
The default aeonics.security.Constraint item representation is:
{
	id: internal constraint id
	name: the constraint name
	created: internal creation date

	field: the name of the security context parameter that should be matched
	rule: the matching pattern to apply (not a RegExp)
}
Token
A token references an authenticated user. Instead of providing the user name and password, you can
generate and use a token. The token is typically used in the context of HTTP requests to use the Authorization: Bearer
authentication mechanism. Other components can leverage the same behavior to authenticate users.
Tokens have a validity period expressed in milliseconds. Once the token has expired, it can no longer be used to authenticate the user.
Each aeonics.security.Provider is responsible to issue, revoke and match the tokens with its own users and check the validity period.
// generate a new token valid for 5 minutes
String token = Security.generateToken(user, 300000, true);

// from the token value, retrieve the matching user
// if a matching user is not found (or the token is invalid)
// then the User.ANONYMMOUS is returned.
User user = Security.authenticate(token);
Except in very special cases, you should not need to generate a token manually as it may lead to data leak or unsecure authentication. See Web login for more details about the token generation and usage.
Using the default behavior, tokens can be presented to the user in 2 different ways:
- When server-side storage is enabled, the token is a meaningless random string that allows to match with the system and retrieve the authenticated user.
- When server-side storage is disabled, the token is an encrypted JSON structure that contains the reference to the authenticated user.
In both cases, anyone presenting a valid token will be authenticated as the matching user. This means that the token confidentiality is important.
When using multiple Aeonics instances (typically in case of load balancing or fail over), you should either disable the token storage (which will incur a performance penalty to decrypt tokens for every request), or use a shared or synchronized storage to store tokens. The storage response time is critical to ensure the responsiveness of the system and maintain a low latency.
Provider
The security provider is responsible for a few important steps:
- Retrieve a user based on its user name and password.
- Check if the user is explicitly denied to use the specified topic with the specified context information.
- Check if the user is explicitly allowed to use the specified topic with the specified context information.
- Issue and revoke user tokens.
- Retrieve a user based on a token.
The provider is one layer of the security mechanism altogether. One single provider should only answer for what it is exactly certain. The order and behavior of the providers is further detailed in the Layered model section.
Policy
The policy define a security rule that is applied at the PUBLISH step
by combining constraints. It applies to one or more roles using pattern matching, and it protects access to one or more topics
using pattern matching. Pattern matching is explained in section Pattern matching.
The goal of the policy is to determine if a user is explicitly allowed or denied to use the target topic given a specific context. Allow or deny is to be understood as detailed in the Layered model section.
The default aeonics.security.Policy item representation is:
{
	id: internal policy id
	name: the policy name
	created: internal creation date

	role: the matching pattern to target a role
	topic: the matching pattern to identify the topic
	constraints: a list of constraint ID that applies
	combination: a hint on how to combine different constraints
}
Layered model
The Aeonics security model is based on multiple providers (aeonics.security.Provider) that can coexist to provide a unified access control mechanism.
The selected approach is a fail-fast system in which the most cost-effective checks are performed first to ensure that
more expensive checks are only performed in eligible situations.
The multiple providers taking part in the security mechanism are registered and ordered in the desired way. The providers will be queried in order and the first valid response is directly accepted such that the remaining providers do not need to be checked.
- Authentication: user authentication is performed as soon as possible, usually at
the
INGRESSstep. This stage is only responsible for associating a user with the incoming data, not checking privileges yet. If a token is supplied, every provider is checked using theauthenticate(token, reset)method, this is the cheapest and fastest action. If the user name and password are supplied, then every provider is checked using thegetUser(username, password)method. In both cases, the first non-null response will be elected as the authenticated user, other providers will not be checked. If all providers return null, theUser.ANONYMOUSis used. - Denial: at every
PUBLISHstep, the multiple providers are queried to check if the userisExplicitlyDenied(user, topic, context). Only the provider that matches the user origin will be checked. In other words, each provider manages its own users. In case of theUser.ANONYMOUS, all providers are checked in order. If the provider returns true, others providers are not checked, the operation will immediately be rejected and the approval stage is not performed because an explicit denial has been raised. If all providers return false (the operation is not denied), then the approval stage takes place. - Approval: after the denial stage, the multiple providers
are queried to check if the user
isExplicitlyAllowed(user, topic, context). Only the provider that matches the user origin will be checked. In case of theUser.ANONYMOUS, all providers are checked in order. If the provider returns true, others providers are not checked, the operation will immediately be allowed. If all providers return false (the operation is not allowed), then the operation is rejected.
The final decision can be simplified as:
boolean granted = !isExplicitlyDenied(user, topic, context) && isExplicitlyAllowed(user, topic, context);

The default builtin security provider will use the Roles, Policies and Constraints to determine if the user is allowed or denied. Custom security providers may override that behavior and implement their own logic.
During later REGRESS or EGRESS steps, the components may use the message owner
(the authenticated user) to perform additional fine-grained security checks. The aeonics.rest.TriggerRestEndpoint will
also receive the authenticated user to perform further checks if required.
Custom provider example
The following example shows how to create a custom security provider and perform the most relevant check first. This provider does not override the token generation so that it can reuse the default behavior.
Provider custom = Registry.of(Provider.class).register(new Provider()
{
	public User getUser(String username, String password)
	{
		return Factory.of(User.class).produce(User.class,
			Data.map().put("name", username).put("origin", id())
			);
	}

	public boolean isExplicitlyDenied(User user, String topic, Data context)
	{
		// very fast check
		if( !topic.equals("http") ) return true;
		else return false;
	}

	public boolean isExplicitlyAllowed(User user, String topic, Data context)
	{
		// we actually grant access here, so be careful but fast
		// we know by design that the topic is "http" otherwise it would have been denied already
		if( !quickCheck(user) ) return false;
		if( context.asString("path").equals("/test") ) return true;
		return false;
	}
});

// add our custom provider as the last provider.
// if we dont add it to the list, it will never be used
Security.providers().addLast(custom);
Once the messages arrive to our custom endpoint, by-design, we know it has been through the allow and deny checks first. So we can focus on fine-grained checks.
Endpoint endpoint = new TriggerRestEndpoint("/test", "GET")
{
	public Data handle(Data parameters, User user) throws RestException
	{
		// by design we know the user passed the quickCheck() from the provider
		// and passed the complexCheck() from this endpoint

		return Data.map().put("success", true);
	}
}.security((parameters, user) ->
{
	// by design, we know the user passed the quickCheck()
	if( !complexCheck(user) ) throw new RestException(403);
});
In order to speed up the authentication process and avoid unnecessary object allocation for every message, it is recommended to cache provisionned users in the Registry.
Web login
The recommended login workflow is to first obtain a short lived token using the username and password, and then to use the delivered token to access protected resources. It is recommended to request a token with the most limited validity period (expressed in milliseconds).
$ curl -X "POST" -s \
	-F "name=username" \
	-F "password=password" \
	-F "validity=300000" \
	http://localhost/api/security/login
{
  "token": "2a17925a75fd62618a6721766432cf79e3418adc5be3f7a787b8d69bf57082e9"
}
The response is in JSON format and contains the token value. You
can then supply the token value as the Authorization Bearer for subsequent requests.
$ curl -X "POST" -s \
	-H "Authorization: Bearer 2a17925a75fd62618a6721766432cf79e3418adc5be3f7a787b8d69bf57082e9" \
	http://localhost/api/security/me
{
  "internal": false,
  "created": 1665320850003,
  "origin": "6c034a3a-1529bdcb38100000",
  "roles": ["6a92b816-3529bdcb38100000"],
  "ip": "0:0:0:0:0:0:0:1",
  "name": "username",
  "active": true,
  "id": "4b54ebb7-3529bdcb38100000"
}
In some cases such as a single request, it may be easier to use the direct authentication using the Authorization Basic
method and therefore avoid unnecessary round-trips. This method should be considered with care as it generates more load on the system
when used repeatedly and the username and password appear unencrypted on the network.
$ curl -X "POST" -s \
	-u username:password \
	http://localhost/api/security/me
{
  "internal": false,
  "created": 1665320850003,
  "origin": "6c034a3a-1529bdcb38100000",
  "roles": ["6a92b816-3529bdcb38100000"],
  "ip": "0:0:0:0:0:0:0:1",
  "name": "username",
  "active": true,
  "id": "4b54ebb7-3529bdcb38100000"
}
Storing tokens client-side always introduces a security risk. Although, since the Aeonics tokens are either encrypted or do not carry meaningful information, they can be
conveniently stored client-side with limited information leakage. The Aeonics authentication system does not resort to cookies and thus is naturally
immune to all cookie-based XSS attacks. Meanwhile, if required, it is recommended to store the token in the browser's localStorage and not in a cookie.
This will avoid the cookie being sent with all other requests to the Aeonics system.
REST API parameters
The aeonics.rest.RestEndpoint offers a simple, yet powerful, way to enforce input parameter validation.
The goal is to perform cheap checks as soon as possible to focus safely on the business logic. Additional checks
and custom fine-grained validation may still be performed as required in the REST API body, knowing that by-design, the most common
errors are already handled.
Even though the raw HTTP request is accessible from the REST API body, it is recommended to declare the expected input parameters at the end of the method body to increase readibility for the developers.
- Manual parameter validation (not recommended):
RestEndpoint endpoint = new RestEndpoint("/test", "GET") { public Message handle(Message request, Connection connection) throws RestException { String firstname = request.content().get("get").asString("firstname"); if( firstname == null || firstname.isEmpty() || firstname.length() < 4 ) throw new RestException(413, "Invalid parameter 'firstname'"); String lastname = request.content().get("get").asString("lastname"); if( lastname == null || lastname.isEmpty() || lastname.length() > 20 ) throw new RestException(413, "Invalid parameter 'lastname'"); ... } }; - Automatic parameter validation (recommended):
RestEndpoint endpoint = new RestEndpoint("/test", "GET")
{
	public Data handle(Data params)
	{
		// by-design, we know our parameters are valid
		String firstname = params.asString("firstname");
		String lastname = params.asString("lastname");
	}
}
.add(new Parameter("firstname").min(4).optional(false))
.add(new Parameter("lastname").max(20).optional(false));
The automatic parameter validation allows to perform several simple checks:
- min: the minimum length allowed
- max: the maximum length allowed
- optional: whether or not the parameter is required
- rule: which range of characters are allowed (or a
Predicatethat will perform a custom check). Some predefined constants are available in theaeonics.rest.Parameterclass. - defaultValue: the default value if the parameter is optional and has not been supplied
Protection mechanisms
Aeoncis has several protection mechanisms in place to prevent system instability or brute force access. Those protection mechanisms do not offer a total guarantee against targetted cyber attacks, but provide strong deterrent measures to preserve the resilience of the system.
Reduced attack surface
Aeonics does not use any third-party libraries, dependencies or external code. The system is therefore naturally immune to all of the vulnerabilities past, present or future linked to any other component.
Meanwhile, Aeonics runs on a JVM and is deployed on an operating system. Although those components of the architecture are out of the scope of Aeonics, vulnerabilities in those components may have impacts the Aeonics system. It is therefore recommended to audit your architecture and to update your system to benefit from the latest security fixes.
Aeonics does not prevent you from using third-party libraries even if highly discouraged. Imported components may introduce additional attack vectors and possibly affect the stability of the entire system. It is recommended to limit the number of dependencies (possibly to none), use only well understood methods, and update those dependencies to benefit from the latest security and stability improvements.
Brute force counter-measures
The system is constantly monitoring incoming HTTP requests to the login endpoint, and all requests using the Authorization
header (Bearer or Basic).
The system will detect a brute-force attack pattern based on a certain amount of failed login attempts, or invalid authorization requests within a certain time period. If those attempts do not match a plausible human behavior, the originating IP address will be banned for a certain amount of time.
This protection mechanism ensures that a token cannot be brute-forced in a reasonable amount of time before its own expiration date. A password brute-force attack will be severely impacted but the robustness of the protection mechanism but still depends on the strength of the password itself. Aeonics imposes a maximum length of the user password to 100 characters but does not validate the strength of the password, the entire unicode range of characters can be used.
Denial-of-service counter-measures
There is no possible software measure that can fully prevent targetted massive denial-of-service attacks. The resilience of the Aeonics system can be observed by its capacity to sustain long-lasting attacks without creating instability at the software level, and to prevent overloading the underlying operating system and hardware.
CPU backpressure: during an attack or an abnormal load peak, Aeonics will sparsely allocate the processing power such that the system does not reach a critical overload threshold. The exceeding amount of tasks to be performed will be distributed over time and enqueued in memory.
Memory backpressure: under sustained heavy load or long-lasting attacks, the CPU backpressure mechanism will progressively affect and fill the available memory. Aeonics is constantly monitoring the memory usage at key points in the system to prevent memory starvation. When the available memory is reaching a dangerously low level, the system will progressively slow down the input tasks intake and apply a network backpressure.
During an attack, the system may appear unresponsive to legitimate users because of the abnormal delay required to process requests due to the incredible amount of tasks to carry out. When the load returns to normal or when the attack stops, the system will continue carrying normal operations without the need for any intervention. The processing power usage will remain at nominal capacity (or drop depending on the current load) and the memory will be reclaimed and allocated to new legitimate tasks.
Recommendations
The login brute-force prevention mechanism will issue a log when a suspicious behavior is detected. It is therefore recommended to setup a dedicated monitoring over the logs to intercept those and possibly take more systemic measures to prevent such attacks.
Denial of service attacks can easily be observed at the network appliance level. Whilst Aeonics can sustain such attacks with reasonable resilience, it is recommended to act proactively and intercept the incoming network trafic before it enters your infrastructure. The system might not be overloaded at the processing level, but the network bandwidth may become a bottleneck and affect the user experience.
Aeonics can be safely exposed directly on the Internet, however, it is recommended to setup a web application firewall to prevent illegitimate traffic such that the processing power of the system is dedicated to legitimate requests.
It is recommended to always use encrypted network communications to prevent many attack vectors, to enforce a strong password policy, and to carefully configure the security of the system.
Data loss
By default, Aeonics is a memory-based system as opposed to a file-based system. This implies that any information, including customer data that is being processed or in transit during an outage will be lost. It also means that the completion status of a task interrupted by an outage is unknown.
However, data is not fundamentally more at risk when using a memory-based system because it reduces the attack surface as well as the risk surface:
- In a file-based system, local disk storage introduce another hardware failure risk and additional maintenance requirements.
- In a file-based system, centralized disk storage (NAS, SAN) introduce additional hardware failure at the remote appliance level and at the network level. It also increases the latency of the system to write on remote disks and generates additional maintenance requirements.
- In a file-based system, an outage during a write operation incurs data loss anyway.
- In a file-based system, data is still processed in memory no matter what.
- In a memory-based system, data is processed faster which reduces the data loss window caused by an outage.
- A file-based system introduces loss of data integrity and data corruption attack vectors at the disk level by any other process accessing the same disks, remotely or locally.
- A file-based system relies on an additional third party access right management to secure and protect the files.
- A memory-based system is only vulnerable by direct memory access which only happens with a total (virtual) machine loss of control.
- A memory-based system does not prevent data persistence on a file-system if required.
Some misguided beliefs caused be the fear of data loss favors disk persistence before processing to potentially recover highly valuable data in case of outages. This is usually a design misconception as the data source should consider proper handling only when the system returns positively. Whether data is stored on disk or directly processed in-memory does not change the fact that the origin should wait for a positive answer from the system. The determinant factor being the response time and latency of the system, which, using Aeonics, is not significantly higher than the network latency of cloud systems to begin with:
- The simple ping latency to your local network gateway is usualy between 2 to 3 milliseconds.
- The ping latency to the internet (or remote intranet) is usually between 15 to 25 milliseconds.
- The overhead latency of a complete HTTP REST API round trip on Aeonics is usually between 0.1 to 0.3 milliseconds.
Monitoring
Monitoring of the Aeonics system is trivial as it runs as a single process. General resources monitoring of the disk, CPU, RAM and network can be managed by standard tools. General monitoring of the operating system, process or service is operating system specific but can be handled by standard monitoring tools. Other Docker, Kubernetes or VM execution and status can be handled by standard monitoring tools.
In most cases, standard monitoring is sufficient to ensure the system is running. Meanwhile, it does not provide fine-grained information about the internal system status.
Metrics
In addition to builtin metrics, the Aeonics counters system is a highly efficient and fully integrated metrics facility accessible via a single class.
The aeonics.data.ingress.Monitor class is available anywhere in the system and offers the possibility to manage counters
the same way as any incoming data so that it can be processed by the system.
Response time
By default, the response time of HTTP requests is advertised in the x-ae-response-time response header. It can be measured when performing
a request manually, or inspected on any outgoing response. This will help identify which requests have abnormal response times.
The value is expressed in nanoseconds.
$ curl -X GET -i http://localhost/api/ping

HTTP/1.1 200 OK
x-ae-response-time: 110800
Content-Length: 2
Content-Type: application/json

""
Overall status metrics
Using the REST API, you can query the overall system status which will provide the following data in JSON format:
- boot: the timestamp of the last system boot.
- load: the number of pending tasks enqueued in memory.
- memory: the amount of heap memory bytes used by the system.
- now: the timestamp at which the monitoring data was obtained.
$ curl -X GET http://localhost/api/admin/system/status \
	-u user:pass

{
  "boot": 1666790394822,
  "load": 1,
  "memory": 10320624,
  "now": 1666791325158
}
RAM/CPU metrics
Using the REST API, you can query the internal RAM usage and CPU consumption of the system. The response contains the following data in JSON format:
- cpu
- process: the "recent cpu usage" for the JVM process expressed in percentage of the overall capacity.
- system: the "recent cpu usage" of the entire machine expressed in percentage of the overall capacity.
- cores: the number of processors available to the JVM
- pid: the JVM process identifier
- memory
- heap: the current memory usage of the heap that is used for object allocation
- committed: the amount of memory in bytes that is committed for the JVM to use
- max: the maximum amount of memory in bytes that can be used for memory management.
- used: the amount of used memory in bytes.
- detail: the internal memory pools details.
- nonheap: the current memory usage of non-heap memory that is used by the JVM
- committed: the amount of memory in bytes that is committed for the JVM to use
- max: the maximum amount of memory in bytes that can be used for memory management.
- used: the amount of used memory in bytes.
- detail: the internal memory pools details.
- physical: the physical memory of the machine
- process: the amount of virtual memory that is guaranteed tobe available to the running process in bytes
- max: the total amount of physical memory in bytes.
- free: the amount of free physical memory in bytes.
- heap: the current memory usage of the heap that is used for object allocation
$ curl -X GET http://localhost/api/admin/system/usage \
	-u user:pass

{
  "memory": {
    "heap": {
      "committed": 278921216,
      "max": 1073741824,
      "used": 16193664,
      "detail": [...]
    },
    "physical": {
      "process": 747868160,
      "max": 34064916480,
      "free": 22788186112
    },
    "nonheap": {
      "committed": 60948480,
      "max": -1,
      "used": 33227328,
      "detail": [...]
    }
  },
  "cpu": {
    "process": 0.02405380302457215,
    "system": 0.06578697110297949,
    "cores": 8,
    "pid": 25792
  }
}
Network connections
Using the REST API, you can list all the registered incoming network connections in the system. The response may vary based on the connection type, but it usually contains the following data in JSON format:
- ip: the client ip address
- port: the port on which the connection is established
$ curl -X GET http://localhost/api/admin/system/connections \
	-u user:pass

[
  {"ip": "127.0.0.1", "port": 80, ...},
  ...
]
Counters
The aeonics.data.ingress.Monitor allow to accumulate values over time, based on a three-level deep hyerarchy.
Every time a metric is updated, an individual counter is also incremented.
This means that you have two values available: the accumulated total and the count.
By default, Aeonics collects various metrics from the system including execution time in nanoseconds, bytes transfered on the network,
and number of executions for certain elements. These elements are structured in 3 levels which are:
- The component type (eg:
aeonics.data.Ingress) - The item id
- The associated user id or the
_globalkeyword
The metrics are published into a topic and can be handled by the system like any other data. The properties _from and
_to indicate the time interval for the collection of the metrics at the nearest millisecond.
{
	"_from": 1678177438005,
	"_to": 1678177443005,
	"aeonics.data.Topic": {
		"1af5f6c3-a364fb3a2cd42000": {
			"_global": {"total": 0, "count": 100000},
			"560f6bb5-2c2bc35a2cd42000": {"total": 0, "count": 25000},
			"33667578-a95deed92cd42000": {"total": 0, "count": 75000}
		}
	}
}
In this example, we can see that the monitoring interval was 5000ms and 100.000
messages were published globally on the topic with id 1af5f6c3-a364fb3a2cd42000.
Two users were involved: the user 560f6bb5-2c2bc35a2cd42000 with 25.000 and
the user 33667578-a95deed92cd42000 with 75.000 messages.
We can also average the message publication rate to 20.000 msg/s by dividing the counter value by the time elapsed.
{
	"_from": 1678177438005,
	"_to": 1678177443005,
	"aeonics.network.Connection": {
		"127.0.0.1-out": {
			"_global": {"total": 56719557, "count": 100000}
		},
		"127.0.0.1-in": {
			"_global": {"total": 16930861, "count": 50000}
		}
	}
}
In this other example, we can see that the monitoring interval was 5000ms again.
This time, the second level matches the ip address of the client either in or out.
There were 100.000 outgoing messages on ip address 127.0.0.1 for a total of 56.719.557 bytes.
This means that the average message size was 567 bytes and the bandwidth used was about 11 MB/s.
There were 50.000 incoming messages on ip address 127.0.0.1 for a total of 16.930.861 bytes.
This means that the average message size was 169 bytes and the bandwidth used was about 3 MB/s.
Logger
The Aeonics logging system is a highly efficient and fully integrated logging facility accessible via a single class.
The aeonics.system.Logger class is available anywhere in the system and offers the possibility to emit logs the same way as
any incoming data so that it can be processed by the system.
Standard logging
A log entry is composed of:
- A severity level: higher is more critical
- A context name: allows filtering and routing
- A message: the actual content
- Some additional info: substituted in the message at runtime
Logger.log(999, "log context", "log message");
Logging implies generating data when some condition apply. Conceptually, processing this sort of data is no different from any other data, which is what the Aeonics system does. The Aeonics system emits all logs as events which are processed according to the user configuration and business logic. Therefore, you have the freedom to configure the filtering rules and the final destination of all log entries.
The logger has many log() variants which allows to generate meaningful messages for troubleshooting
purposes, or even for business logic purposes. The log.level configuration parameter is available at startup
and can be modified at runtime. The system will ignore all log entries which have a severity level lower than the configured log
level.
The log level, and the matching log entry severity level, can be any integer value. The following constants are predefined and used by the core system:
- SEVERE: Value 1000 is a message level indicating a serious failure.
- WARNING: Value 900 is a message level indicating a potential problem.
- INFO: Value 800 is a message level for informational messages.
- CONFIG: Value 700 is a message level for static configuration messages.
- FINE: Value 500 is a message level providing tracing information.
- FINER: Value 400 indicates a fairly detailed tracing message.
- FINEST: Value 300 indicates a highly detailed tracing message.
The log entry context can be set as free text, or as a java class to help troubleshoot technical issues, this is the primary usage of a logging facility.
try { ... }
catch(Exception e) { Logger.log(Logger.WARNING, this.getClass(), e); }
When emitting logs, you do not know if the log entry will actually be used or not. Therefore, in order to avoid costly string substitutions
when it is not required, you should use {} placeholders in the message and provide the parameters to inject.
This will save lots of text manipulations if the log message does not match the severity level, resulting in improved performance.
Logger.log(Logger.FINEST, this.getClass(), "{} + {} = {}", 33, 9, 42);

// the text is filled only if-and-when necessary
// -> 33 + 9 = 42
If a plain object is sent to the logger, it is automatically converted to its string representation. For data objects, this means JSON. Logging data objects as JSON provides even more power to the recieving end of the logging system to extract and work with log entries rather than plain text.
Data data = Data.map().put("foo", "bar");
Logger.log(Logger.INFO, this.getClass(), data);
Http error messages
When throwing an exception from a HTTP endpoint, the system generates automatically a response with the exception's getMessage().
If the log.level configuration parameter is set to FINE or lower, then the full stack trace
of the exception is also sent with the response.
It is therefore important to double check that no sensitive information is transmitted in the error message or in the stack trace. Meanwhile, it may be a valuable source for troubleshooting while in development phase. In production, if a repeatable error happens, you can modify the log level at runtime to generate a full stack trace, then restore it to an acceptable value.
Debugger
Live debugging
Troubleshooting a live system is touchy and complex, often it is hard to reproduce the conditions that caused an error. Semantically different although
technically similar to logging, the aeonics.data.ingress.Debugger allows to inject custom messages into the system and consume those using
i.e. websockets for real-time debugging.
In a data flow, it is possible to insert a aeonics.data.regress.Debug in the REGRESS step to capture
live data that passes by, or insert another aeonics.data.egress.Debug in the EGRESS step to capture the final output.
In your code, you can directly call the debugger debug() method to emit debugging information.
Depending on the workload, debug messages may be numerous. Therefore, each debug message can be accompanied by a tag that is used to filter which messages to receive in the live output. The filtering uses pattern matching for more flexibility.
Debugger.debug("my_tag/message", "custom message");
Debugger.debug("my_tag/stacktrace", new Exception());
Stack trace
By default, the stack trace included in the logs are filtered to exclude all java and aeonics native calls. This feature allows to produce more concise
stack traces that are more relevant to your business logic. However, the entire stack trace can be activated by setting the log level to the value 42.
It is not recommended to use this configuration other than to debug the system in development mode.
When a REST API call triggers a RestException, the error code, description and cause are included as a JSON body response. It is possible to include
the stack trace of the error by setting the log level below or equal to FINE (500).
It is not recommended to use this configuration other than in development mode because some information may leak to the user.
Advanced
Random ID
The Aeonics system heavily relies on items to convey data or encapsulate behavior in the form of functions.
Each item has a aeonics.system.Unique.ID that is partially randomly generated.
Duplicates IDs for persistent elements is problematic if they are stored in the same registry category.
Duplicate IDs for persistent elements in different registry categories is something we want to avoid but it does not cause any harm.
Duplicate IDs for ephemeral short-lived elements is not a problem if not required by the business logic.
The IDs are generated using:
- 31 bits of randomness
- 63 bits of relative time expressed in nanoseconds
This implies that there is at least 50% chance of collision if more than 77.000 IDs are generated at the same nanosecond. Meanwhile, the nanoseconds are not absolutely positionned in time and may overflow or repeat non-deterministically more than once on a given system. Moreover, no guarantees are made about how frequently the nanotime value changes due to system time precision. This is why we consider that the chance of collision is above 50% if more than 100 million IDs are generated every millisecond instead.
The reason for not using a standard UUID is that the aeonics.system.Unique.ID uses less space in memory and on storage, and
is at least 10 times faster to generate which saves some processing resources for other useful tasks. The aeonics.system.Unique.ID cannot
be seeded and therefore resets the probability of collision at every measurable nanosecond whereas the standard UUID relies on sole randomness.
The string representation of the IDs is of the form 01f81a24-e94e8f23ff943000 with the most likely varying characters first. This ensures that
the comparison between IDs is following the fail-fast principle and returns false as early as possible without the need to compare the remaining characters.
The aeonics.system.Unique.ID is to be seen as an opaque string and may change in length or generation mechanism in the future.
Pattern matching
The pattern matching principle is used by various components in the system such as the security policies and constraints, or as topic subscriptions.
It is used to select a set of items that match the pattern. Although it is possible to customize the special characters, the general principle of the
aeonics.util.WildcardStringMatcher is the following:
- The subject to match is a string delimited by a separator character. By default, the separator character can be either
/or.and both can be mixed together."a/b/c" = "a.b.c" = "a.b/c"
- Each substring of the subject between separators is called a part
part 1: "a"
part 2: "b"
part 3: "c"
- The pattern matcher is also a string delimited by a separator character. The matching is case sensitive for each part.
pattern "a.b.c" matches subject "a/b/c" because all parts match, regardless of the delimiter
pattern "a.b.c" does not match subject "a.B.c" because some parts do not match with case sensitivity
pattern "a.b" does not match subject "a.b.c" because some parts are missing from either the pattern or the subject
- The pattern may contain partial wildcard characters to match one entire part or the trailing of a part. By default, the partial
wildcard character can be either
*or+and both can be mixed together. The partial wildcard character is only meaningful for the pattern and there is no character escaping to match those characters in the subject. That is, the subject should not contain any of the partial wildcard characters.pattern "a.b.*" matches subject "a/b/c" and "a/b/zzz" because the last part can be anything
pattern "a.b+.c" matches subject "a/b/c" and "a/bzzz/c" but not "a/zzz/c" because the middle part does not start with 'b'
The partial wildcard character should be the last character of a part of a pattern. There is no check about this but it can only lead to unpredicted results.pattern "a.b*.c" is valid but "a.*b.c" is not because the '*' is followed by another character
- The pattern may contain a global wildcard character to match everything and all parts after it. By default, the global
wildcard character is
#. The global wildcard character is only meaningful for the pattern and there is no character escaping to match this character in the subject. That is, the subject should not contain the global wildcard character.pattern "a.b.#" matches subject "a/b/c" and "a/b/c/d/e/f" but not "a/b" because it requires at least 3 parts
pattern "#" matches everything
The global wildcard should be the last character of a pattern. There is no check about this but it can only lead to unpredicted results.pattern "a.#" is valid but "a.#.b" is not because the '#' is not the last character of the pattern
- The pattern may be inverted using one leading negation character
!. Using a negated pattern means "all except".pattern "!a.b.c" will match everything except "a/b/c"
- It is possible to match two patterns against each other using the
matchesBothWildcard()method. This combines the strength of the wildcard.pattern "a.*.c" matches the other pattern "a.b.*" because they are compatible with each other
These rules allow to use easy subject strings such as a URL and perform advanced filtering and selection using all variations of the pattern. Although it seems simple at first, the combined matching logic can quickly lead to rules incredibly hard to grasp by humans. Use simple rules when possible, and carefully use advanced rules when required.
pattern "!a.b*.c.*.d#" will match subject "a/b/c/d/e" but not "a/b/c/e/d"
Pattern matching can work directly on strings as well as memory views. It does not offer as much possibilities as regular expressions, but it performs generally 3 to 5 times faster.
MemoryView
The concept of memory view is to avoid duplicating bytes in the memory until is it absolutely needed. This means that the system would require less available memory to operate and would avoid time-consuming memory duplications. Meanwhile, Aeonics is a Java based system using automatic garbage collection as opposed to other compiled languages that can directly manipulate bytes in memory such as C or C++. By default, all primitive variables and strings are immutable and will lead to multiple copies of the bytes in memory.
String foo = "foo"; // 3 bytes of useful data in memory
String bar = "bar"; // 3 more bytes
String foobar = foo + bar; // foo and bar are duplicated, 6 more bytes in memory
foobar = foobar.toUpperCase(); // foobar is duplicated, 6 more bytes in memory
Although, it is possible to manipulate the memory outside of the JVM reach using reflection and direct ByteBuffer or the infamous Unsafe class.
Those methods are considered bad practice because they go against the Java encapsulation principles, escape the garbage collector or can truly break the system if not
used properly. Aeonics does not use these mechanisms and has instead implemented the concept of memory view in an attempt to increase the system efficiency
when working with String and byte[].
A aeonics.memory.MemoryView is a wrapper around one or more byte[]. It offers many string manipulation methods that will work directly against
the bytes in-place instead of duplicating the memory area.
MemoryView foo = Memory.from(new byte['f', 'o', 'o']); // 3 bytes of useful data in memory
MemoryView bar = Memory.from(new byte['b', 'a', 'r']); // 3 more bytes
MemoryView foobar = MemoryView.from(foo, bar); // foo and bar are referenced, 0 more bytes in memory
foobar = foobar.toUpperCase(); // foobar is modified in-place, 0 more bytes in memory
The memory view takes a real meaning when dealing with bytes that are read from I/O such as files or network and loaded in a data structure. Overall, a memory view exposed through a data object offer the best possible tradeoff: the content of the memory is not read nor modified until and unless it is necessary.
MemoryView mv = MemoryView.from(Files.readAllBytes(Paths.get("data.json")));
Data data = Json.decode(mv); // bytes are referenced, not duplicated
int foo = data.asInt("foo"); // now the target bytes are parsed to create an int, but other bytes are left untouched
This late evaluation principle saves a lot of processing power and intermediate memory allocations. It is a bet that most data is to be forwarded as-is and only a subset of it will actually need to be decoded individually. Of course, it means that the entire data must hold in memory and it will only be garbage collected when disposed entirely.
MemoryView foobar = MemoryView.from("foobar"); // make "foobar" as 6 bytes
foobar.discardBefore(3); // disregard the first 3 characters -> "foobar" becomes "bar"
	// although, the 6 bytes of "foobar" are held in memory
MemoryView foobar = MemoryView.from("foo", "bar"); // make "foobar" as 2 times 3 bytes
foobar.discardBefore(3); // disregard the first 3 characters -> "foobar" becomes "bar"
	// only 3 bytes remain in memory because "foo" can be reclaimed
Since the memory view is working on raw bytes, it has the possibility to work with text string as well as binary content such as images or else. However, it does not have any knowledge of the underlying character encoding. Please refer to the charset section for more details about this.
Charset
Data can be transferred using different character encodings depending on the protocol or can be pure binary. By default, the system makes no assumption on the
interpretation of the data and wraps the raw bytes in a MemoryView. When converting a memory view to a string, the system will try to interpret the
bytes as UTF-8. If some characters or bytes do not fit the UTF-8 space, then ISO-8859-1 is used instead, because this encoding allows the full
range of bytes 0x00 - 0xFF. Aternatively, you can specify which charset to use.
MemoryView m = MemoryView.from(new byte[]{ 0xC3, 0xA9 }); // é in UTF-8
m.toString(StandardCharsets.UTF_8); // data interpreted as UTF-8 : é
m.toString(StandardCharsets.ISO_8859_1); // data interpreted as ISO-8859-1 : é
m.toString(); // data discovered as UTF-8 : é

MemoryView m = MemoryView.from(new byte[]{ 0xE9 }); // é in ISO-8859-1
m.toString(StandardCharsets.UTF_8); // data interpreted as UTF-8 : � (invalid)
m.toString(StandardCharsets.ISO_8859_1); // data interpreted as ISO-8859-1 : é
m.toString(); // data discovered as non-UTF-8, so ISO-8859-1 : é
In case of JSON, the system will encode special characters using the unicode escaping notation \u0000. If the output data is
encoded in UTF-8, in ISO-8859-1 or wrongly double-UTF-8 encoded, it will be properly interpreted and converted.
MemoryView m = MemoryView.from(new byte[] { 0xE9 }); // é in ISO-8859-1
System.out.println(Data.wrap(m)); // "\u00e9" (unicode escaping)

MemoryView m = MemoryView.from(new byte[] { 0xC3, 0xA9 }); // é in UTF-8
System.out.println(Data.wrap(m)); // "\u00e9" (unicode escaping)

MemoryView m = MemoryView.from(new byte[] { 0xC3, 0x83, 0xC2, 0xA9 }); // é wrongly encoded (UTF-8 of UTF-8)
System.out.println(Data.wrap(m)); // "\u00e9" (unicode escaping)
If you need to check which encoding is compatible with the input data, you can use the aeonics.util.StringUtil helper methods.
MemoryView m = MemoryView.from(new byte[]{ 0xC3, 0xA9 }); // é in UTF-8
StringUtil.isUtf8(m); // true
StringUtil.isAscii(m); // false
StringUtil.isISO8859(m); // false because it contains UTF-8
Async
Performing tasks asynchronously is not so obvious in Java because it is synchronous by nature. There is no possibility to pause a task and resume it without actually blocking the current thread. Although, sometimes, we would benefit from splitting a task in small parts that can be executed in parallel, or return early from a function while some other subtask continues to run... There are many ways to perform such things in Java, but none easy enough to use without side effects.
Thanks to the compartment model used by Aeonics, you have the ability to defer processing of some tasks
using the aeonics.util.Async class. A task submitted to a compartment will be executed some time in the future depending on the
available processing power and the number of other pending tasks. Meanwhile, the calling function is not blocked and can return early.
public void foo()
{
	Async.run(() ->
	{
		Thread.sleep(2000);
		System.out.println("perform this later");
	});

	System.out.println("return early");
	return;
}
If you need to process the result of an asynchronous task, you can use the .then() construct much like Javascript. You can specify in which
compartment the task should execute, and all subsequent tasks (then) will also be executed in the same compartment. If you need to execute a subtask
in another compartment, run a new Async.
Async.run(() -> { return 42; }, "compartment name")
.then((value) -> { return value + 1; })
.then((value) ->
{
	Async.run(() -> { System.out.println(value); }, "another compartment");
});
Not everything always runs as expected, this is why you most probably want to catch the exceptions that happened in the asynchronous processing, this
is possible with the second parameter of the .then() method.
Async.run(() -> { throw new Exception("error"); })
.then(
	() -> { System.out.println("success"); },
	(error) -> { error.printStackTrace(); }
);
Finally, if you need to wait for the result of an asynchronous task, you can use the .get() or .await() methods. Although,
remember that the current task will be blocked during the waiting time and the compartment worker will not be able to execute other tasks while
waiting. In this case, you should carefully weight the need to perform a task asynchronously or check if it can be performed synchronously instead.
// foo() will run in the background but we wait for the result to proceed
String foo = Async.run(() -> { return foo(); }).get();

// foo() is run synchronously which is the same
String foo = foo();
Keep it simple
The Aeonics systems heavily uses Async tasks under the hood but things can become messy very quickly. When running a task asynchronously, you lose the
stack trace because it is executed in a compartment worker thread, which makes it harder to troubleshoot problems. There are many more options available on
the aeonics.util.Async class to resolve or reject tasks manually, or react to the outcome of multiple tasks at once and so forth.
Remember that in the Aeonics system, everything is already an asynchronous task run in a compartment, so except for very specific cases, there will be little benefit from using the Async class. In the contrary, it will usually incur some performance penalty because the execution context has to be transferred to another compartment or another worker. Most of the classes provided in the Aeonics SDK are already using asynchronous tasks intelligently when it is most likely advantageous.
Dead locks
Caution, it is possible to cause a dead-lock situation that will entirely block a compartment under certain conditions. Imagine a compartment with only 1 worker. If a task waits for another task to complete in the same compartment, then it will wait indefinitely because the other task will never have the possibility to execute.
Compartment.createOrResize("test", 1);
Async.run(() -> {
	Async.run(() -> { }, "test").await();
}, "test");
This situation may happen (unluckily) even if a compartment has many workers. In such a case, it will be very hard to reproduce the blocking condition and even harder to identify it.
There are two ways to entirely avoid this situation:
- Use an unbounded compartment that will create as many workers as there are tasks to execute. This will not be very efficient because
a new worker needs to be initialized for every task.
Compartment.createOrResize("unbounded", -1); - Use a recursive compartment that will execute subtasks synchronously if it detects that the calling task is already executing
in the same compartment.
Compartment c = Compartment.createOrResize("recursive", 1);
c.recursive(true);
Timeout & Scheduler
Performing an action after a certain time has elapsed, at certain time interval, or cleaning up outdated resources is a frequent necessity that must happen in the background while normal operations are carried out. A proper time scheduling policy is easy to do wrong, leading to increased resource consumption or unnecessary memory retention.
The aeonics.util.Timeout class has the ability to work with relative time intervals such as "in 10 minutes from now".
The aeonics.scheduler.Scheduler class has the ability to work with absolute time points such as "at 10:30 PM".
Timeout
All background tasks are registered in the Registry, a task that is not in the registry will not be checked. When creating a new instance of a predefined background timeout checker, it is automatically registered in the registry for convenience.
The Timeout.AbsoluteTimeout is called repeatedly and shall return the number of milliseconds until the next check, this is the most simple form.
new Timeout.AbsoluteTimeout((now) ->
{
	... // perform some actions

	if(false) { Registry.of(Timeout.class).remove(this); } // stop this timeout by removing it from the registry
	else { return 1000; } // milliseconds until next check
});
A more elaborate timeout will watch over objects and trigger a function when a timeout occurs. You should use a Timeout.StrongTimeout if
the objects must be preserved in memory while being watched, or a Timeout.WeakTimeout if the objects may expire naturally if they are no longer used (e.g.:
garbage-collected). The behavior of either is as follows, it works with time intervals in nanoseconds.
Timeout.StrongTimeout<Data> t = new Timeout.StrongTimeout<Data>(
(item, start, now) ->
{
	long alive = now - start; // number of nano elapsed
	return Math.min(0, item.asLong("max") - alive); // when to check next
},
(item) ->
{
	// item has timed out and removed from the watch list
	System.out.println(item);
});

t.watch(Data.map().put("max", 10_000_000_000L));
Scheduler
All scheduled tasks are ingress functions registered in the Registry. When a scheduled task is triggered, it produces a message
that can be processed by the system. The abstract aeonics.scheduler.ScheduledIngress is represented as:
{
	ical: the recurence of the task in ICAL format (RRULE)
	topic: the name of the topic in which to publish messages
	tag: The message tag to use
}
Using one of the existing implementations or using your own, you can decide to run tasks according to standard calendar time definitions (ical). This is great to register annual birthdays, weekly operations, or tasks to run every minute. The scheduler operates with millisecond precision but may undergo some small time offsets if there are many tasks to run. To compensate this, the scheduler always provides the ZonedDateTime of the current operation to account for time zones, daylight saving time, leap years and such.
Discard
When messages in the system cannot be processed because of an error, or because it did not match any known flow, they are not lost! The Aeonics system includes a special dedicated discard topic in which all these messages are published as last-resort. Users can thus setup some business logic using the same processing steps to manage information that did not successfully get processed.
To use the discard mechanism properly, you should use the aeonics.ingress.Discard such that when messages are published in the discard
topic, the following information are added to the metadata:
- discard_cause: the detailed information about why this message has been discarded. It may be an exception, or a plain text message.
- discard_reason: a numerical value indicating the reason type to discard the message. It may be any integer value although the following
are predefined:
- 1:
Discard.EXPIRE, the message was discarded because it is no longer valid due to time - 2:
Discard.ERROR, the message was discarded because of an uncaught error - 3:
Discard.IGNORE, the message was discarded because it did not match any handler - 4:
Discard.DROP, the message was discarded because it was explicitly dropped in the flow - 5:
Discard.POLICY, the message was discarded because of queue policy (e.g.: too many pending message)
- 1:
- discard_topic: the original topic in which the message was published (if any)
Discard.discard(message, Discard.DROP, "Precondition failed");
When messages are published in the discard topic, the path() of the message is preserved but prepended with the [discard_reason]/.
This provides an easier way to subscribe to different types of exceptions. Using this mechanism, you can leverage the discard mechanism to complement your
business logic and defer processing of non-compliant information in a distinct branch. This adheres to the fail-fast principle and helps focus on the
most relevant business process first.
if( !compliant ) {
	message.path("new/path/for/business/purpose");
	int custom_code = 4321; // indication for the discard processing

	Discard.discard(message, custom_code); // the actual path is: 4321/new/path/for/business/purpose
	// users can then setup a sunscription to handle these type of messages
}